Right where to start, after much messing about with sandpaper, wet and dry and bleeding finger tips ive found a relitively cheap and quick way to mirror polish,so here we go
You will need the following,
1 x electric drill
1 x dremel (for the tight spaces)
1 x 80 grit greaseless compound
1 x 180 grit greasless compound
1 x 300 grit greaseless compound
1 x polishing kit from here
3 x sisal mops
all of the above minus the drill and dremel can be bought from the link and comes to £23.50 delivered and you should have enough to polish every alluminium part on your car.
WARNING this is just a guide on how i did it some may do it differently i will not be held responsable for any damaged parts or loss of fingers.
STEP 1
first things first is to degrease the part you want to polish.
STEP 2
attach the taper to you drill and twist on a sisal mop start with your 80 grit greasless compound apply it to the mop and leave for 5 mins to harden.once hardened start to mop over the piece with the wheel.apply medium pressure to the drill once you have done the whole piece you should be left with no casting marks and should look like this
do this step with the 180 grit followed by 300(remember you need to remove the sanding marks from the 80 grit with the 180 and remove the 180 grit marks with the 300 grit) you should now be left with a piece that looks satin finished
(note: use one wheel to one compound)
STEP 3
you now need to move onto your polishing compounds start off with the greyish/black compound on a sisal mop, give the drill some speed and hold the compound bar against the wheel for no more than a second(if you use to much compound you will end up with a black sort of film around the edge of the piece)the key to using compound is little and often, to much compound will cause it to be less efficient,you will need to work with this compound the most to remove any scratches from the grit stage which does take some time so be patient.you should be left with a dull ahine on the piece and some very light scratches.now all thats left to do is get a clean cloth and wipe the piece over(you should repeat this after each compound)
STEP 4
your next step is to move on to your close stitched mop and the green cutting compound again the key is little and often this process will coluor and brighten the piece and remove any minor scratches.
STEP 5
your next step is to move on to your loose cotten wheel and the blue compound which has no cutting action at all (again little and often)this will give you a really high shine on the piece, if you are left with some scratches run you nail along the piece, if you can feel ridges in it move back to the grey cutting compund in step 3.if you are left with any swirl marks damp down the piece with a damp cloth and sprinkle some talc over the piece and repeat this step.your end product should look like this
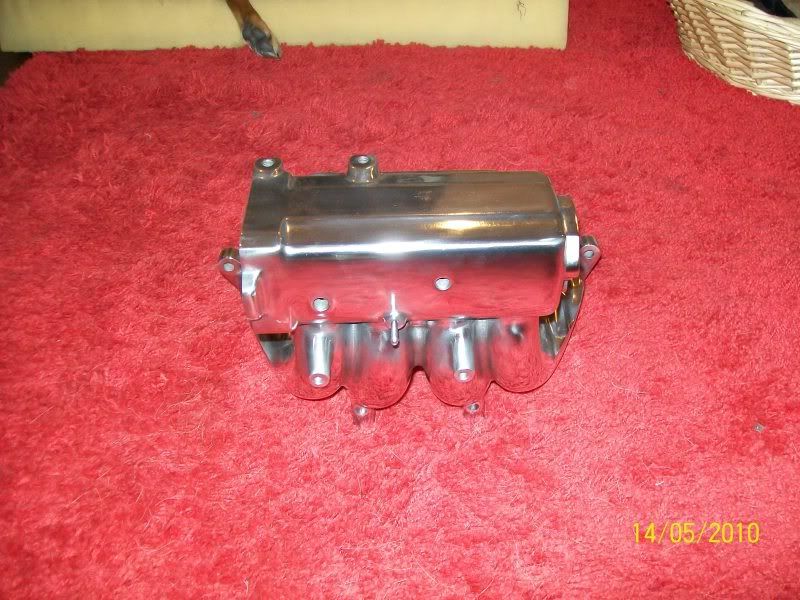

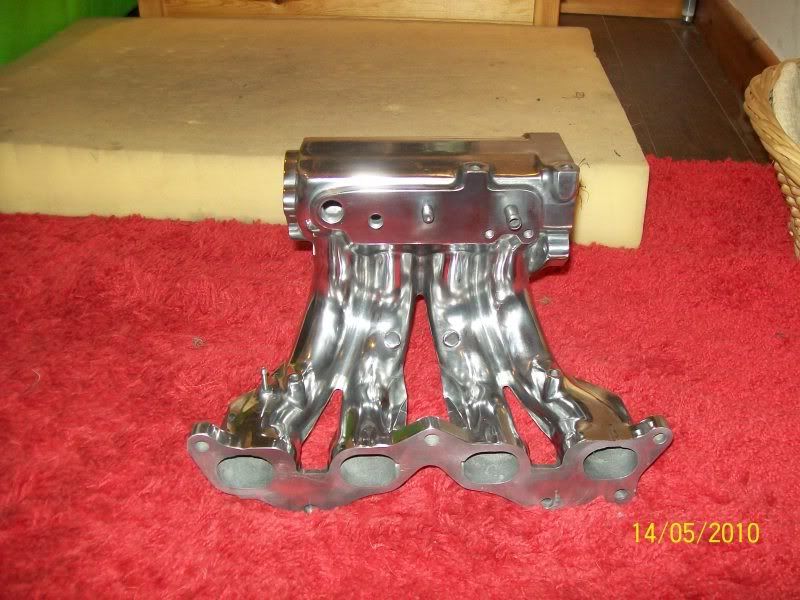
(my computer is being stupid at the moment and i cant seem to find the pictures i will edit this post when i have found them)
I hope this will be of some use to people and also mods im not sure if this is in the right section or not so please feel free to move it
cheers james
You will need the following,
1 x electric drill
1 x dremel (for the tight spaces)
1 x 80 grit greaseless compound
1 x 180 grit greasless compound
1 x 300 grit greaseless compound
1 x polishing kit from here
3 x sisal mops
all of the above minus the drill and dremel can be bought from the link and comes to £23.50 delivered and you should have enough to polish every alluminium part on your car.
WARNING this is just a guide on how i did it some may do it differently i will not be held responsable for any damaged parts or loss of fingers.
STEP 1
first things first is to degrease the part you want to polish.
STEP 2
attach the taper to you drill and twist on a sisal mop start with your 80 grit greasless compound apply it to the mop and leave for 5 mins to harden.once hardened start to mop over the piece with the wheel.apply medium pressure to the drill once you have done the whole piece you should be left with no casting marks and should look like this
do this step with the 180 grit followed by 300(remember you need to remove the sanding marks from the 80 grit with the 180 and remove the 180 grit marks with the 300 grit) you should now be left with a piece that looks satin finished
(note: use one wheel to one compound)
STEP 3
you now need to move onto your polishing compounds start off with the greyish/black compound on a sisal mop, give the drill some speed and hold the compound bar against the wheel for no more than a second(if you use to much compound you will end up with a black sort of film around the edge of the piece)the key to using compound is little and often, to much compound will cause it to be less efficient,you will need to work with this compound the most to remove any scratches from the grit stage which does take some time so be patient.you should be left with a dull ahine on the piece and some very light scratches.now all thats left to do is get a clean cloth and wipe the piece over(you should repeat this after each compound)
STEP 4
your next step is to move on to your close stitched mop and the green cutting compound again the key is little and often this process will coluor and brighten the piece and remove any minor scratches.
STEP 5
your next step is to move on to your loose cotten wheel and the blue compound which has no cutting action at all (again little and often)this will give you a really high shine on the piece, if you are left with some scratches run you nail along the piece, if you can feel ridges in it move back to the grey cutting compund in step 3.if you are left with any swirl marks damp down the piece with a damp cloth and sprinkle some talc over the piece and repeat this step.your end product should look like this
(my computer is being stupid at the moment and i cant seem to find the pictures i will edit this post when i have found them)
I hope this will be of some use to people and also mods im not sure if this is in the right section or not so please feel free to move it
cheers james