You are using an out of date browser. It may not display this or other websites correctly.
You should upgrade or use an alternative browser.
You should upgrade or use an alternative browser.
Head Removal Sequence?
- Thread starter clarkytrd
- Start date
doesnt matter when removing the head.
x2
No actual purpose to releasing the head in anyway.
Just take them out.
")
williamocarroll1982
Member +
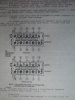
3 ,7, 9 , 6, 2
1, 5, 10 ,8, 4
As you stand in front of the car! It is with this order to avoid bending it.
For installation is :
8, 6, 1, 3, 9
10, 4, 2, 5, 7
Chris
hey im a bit confused by the way you have written down the sequence, is it 3 then 7 then 9 etc or is it, 3 then 1 then 7 then 5 etc. sorry if its a stupid question. and can post a pic of the head showing the head bolt numbers please
350ep70gr
Member +
x2
No actual purpose to releasing the head in anyway.
Just take them out.
:homer::homer::slap::haha:
Chris
350ep70gr
Member +
hey im a bit confused by the way you have written down the sequence, is it 3 then 7 then 9 etc or is it, 3 then 1 then 7 then 5 etc. sorry if its a stupid question. and can post a pic of the head showing the head bolt numbers please
You do first the bolt under the number 1..then move on to the bolt under number 2 and so on...
Hope you get it now..!
Chris
durmz
Member +
You do first the bolt under the number 1..then move on to the bolt under number 2 and so on...
Hope you get it now..!
Chris
rofl, u should have numbered it chris to make it simple...
oh no wait....u did! :haha:
350ep70gr
Member +
rofl, u should have numbered it chris to make it simple...
oh no wait....u did! :haha:
LoL...:beer:
Chris
ragz
Member +
rofl, u should have numbered it chris to make it simple...
oh no wait....u did! :haha:
lol leave the poor guy alone
williamocarroll1982
Member +
You do first the bolt under the number 1..then move on to the bolt under number 2 and so on...
Hope you get it now..!
Chris
Ya i get it now. Im a bit slow lol
clarkytrd
Member +
here ya go dude
Cheers for that John,
Thats what I needed in the first place!
Clarky
x2
No actual purpose to releasing the head in anyway.
Just take them out.
^^ In the trade for 100 years this guy, you best listen! :haha:
Should always release the bolts in a sequence as chris/aze said to avoid warping/cracking the head, its only cast alloy afterall.