You are using an out of date browser. It may not display this or other websites correctly.
You should upgrade or use an alternative browser.
You should upgrade or use an alternative browser.
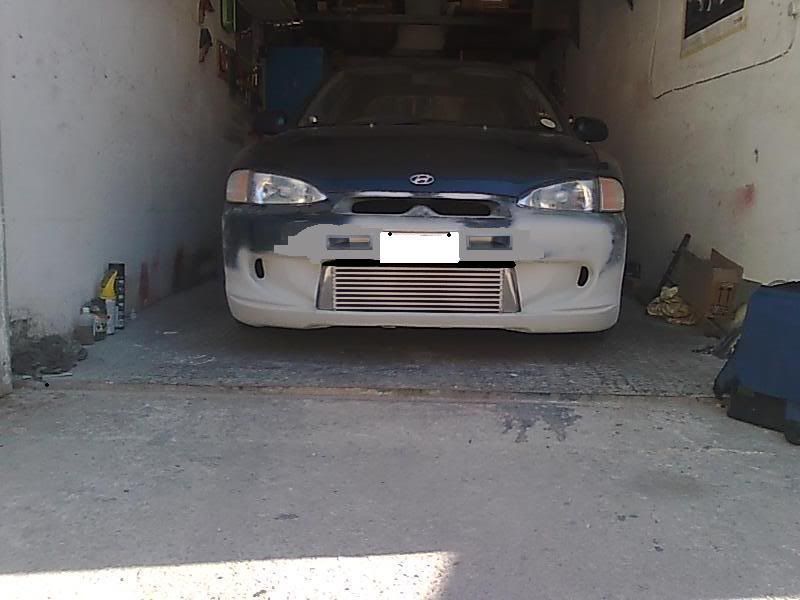
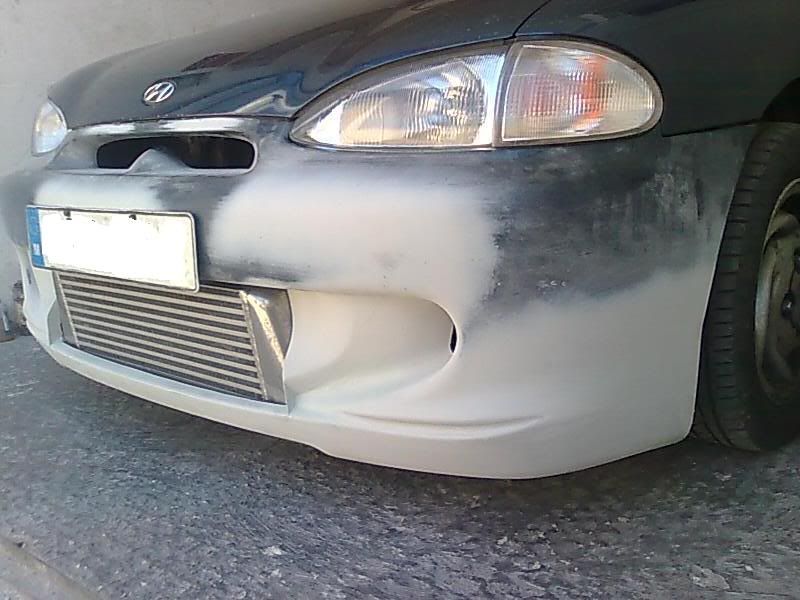
modified the front bumber for hdi intercooler
- Thread starter accent_97
- Start date

bucketep91
Member +
tidy job mate! got any pics before you started? would be interesting to see the difference
jonny-boi32
Member +
that looks like its going to be a hell of alot better now!! dont know bout fogs, might look jus as good the way it is. well done!!
fibre glass was the key of this unfortunately didnt take pics as you need to hurry when working fibre glass and hands may be too sticky to handle a camera the result when i finish it it at this step i couldnt bealive that with fibre glass could creat such things aiming too light the car such as doors fender everything is gona be light weight in this car in short future
corofin12345
Member +
well done man.. way better then it looked before
ok first thing first !!
Safety:
be sure to work in good ventilated areas, if your working in a garage make sure all windows are doors are open at all times when your in there.
Get a good respirator this stuff stinks and can make your chest hurt really bad if you don't use one or end up worse, remember your dealing with flammable and toxic materials !!
get plastic safetyglasses to protect your eyes this stuff will make you go blind if even a small drop goes in so its better to look like a dorky android then loosing one eye
Disposable rubber gloves ( its gonna be messy ),
use old dirty clothes if it gents on them it will not come off !! even shoes dont want to ruin your favorite slippers
starting of by doing the mold:
As for bad wolfs idea of doing arches:
there are alot of things you can use as starter mold like expanding foam, wood, plaster, putty, sheet metal etc .... i think using expanding foam is the best thing you can go with as its really easy to carve and sand
so time to start, first thing is to get a pice of paper and draw the round part of the arch ( the part between the tyre and body ) then continue to draw how it will look like. copy it on a thich cardboard and spray the expanding foam (the canned one not the one you have to mix thats too messy ) the shape you have on the cardboard ant let it set over night.
Next day you would have like a bubbled up mess but think ahead buy a can of bonda filler and then use a sharp knife to carve out the shape you want it to look like and sand it to make it smoother and rounder. nows its bonda filelr time, follow the instructions on how to mix it and fill in the holes on mold your making try to cover it all in bonda filler and leave it settle over night.
Next day you will have solid form but still needs work sand it in shape starting with p120 till wet grade 1500, make sure there are no deep scratches still visible or touchble and you have your pre-mold ready !!!!
Now the easy part:
Spray it with filler spray to be sure you got rid off minor scratches and then spray it with cheap bottled spray i prefer black as it shows off any imperfections and again let it cure overnight
Now for the proper mold:
you will need:
Gelcoat,release wax,resin,hardner,teaspoon ( not reusable for tea after ) cheap bristle brushes, empty food cans for mixing and fibercloth, try to get 2 types one that is really thin and looks like T.P. and the strand one.
Starting to make a mold:
polish your pre-mold with normal car polish let it dry then remove and 3 times with release wax, removing it everytime, don't worry not all will go off its fine.
when its done fill up a food can ( make sure its clean and dry ) with gel coat and put 1 and 1/2 teaspoons of hardner in and mix well ( if the temp is over 17 deg put in just 1 teaspoon) not with the spoon but any thing you can find like metal/plastic rods that are disposable. Get the brush and start "painting" on your pre-mold and make sure you cover the whole thing. don't worry if itssettling on the cardboard or running down its all gooooood leave it dry overnight ....
Next day: cut out small rectangles of the T.P. cloth ( loll ) about 3 inches wider then the pre-mold and 8 inches thick , remember to touch the pre-mold and make sure its dry if not leave it overnight again ( should have dried up but just incase ) if its dry then mix 1 Food can of resin and put 1 and 1/2 teaspoons of hardner again mix really well and start "painting" it again ( don't worry if you see the gelcoat coming onto your brush its normal )when its done get the T.P. like fibercloth and put at the end ( always start at ends ) and start tapping it in shape with a wet resin coated brush and do as follows:
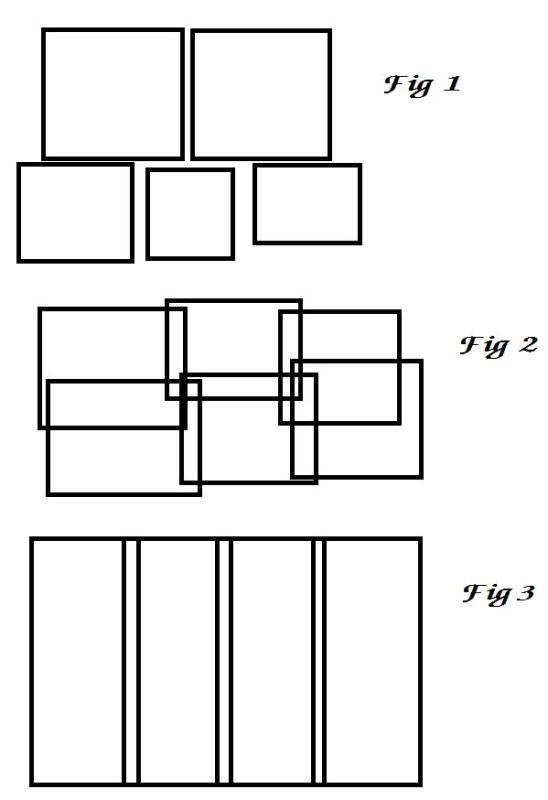
Do not put the fibercloth like fig 1 it wont be solid when it dries up try to do like fig2 if working on a large surface or in this case fig 3, overlapping the clothes bonds them together and thats the secret behind its strenght
Notes: if there are air bubbles keep tapping them with the brush till is gone and be sure that the whole cloth is covered if it looks dry it needs more resin, aply some more by tapping again with a resin coated brush .. when the whole thing is coated let it cure over night.
Next day again now its time to do all the same as putting t.P. cloth on but instead using the stranded cloth same principle like before but use more resin to make sure its all "wet with resin. let it set overnight and repeat the procces till you have 1 gelcoat layer 1 t.p. layer and 3 strand cloth on it...
then its fully dry and you can pull the-pre mold out !!! and you have a mould you can use till the world ends
Safety:
be sure to work in good ventilated areas, if your working in a garage make sure all windows are doors are open at all times when your in there.
Get a good respirator this stuff stinks and can make your chest hurt really bad if you don't use one or end up worse, remember your dealing with flammable and toxic materials !!
get plastic safetyglasses to protect your eyes this stuff will make you go blind if even a small drop goes in so its better to look like a dorky android then loosing one eye
Disposable rubber gloves ( its gonna be messy ),
use old dirty clothes if it gents on them it will not come off !! even shoes dont want to ruin your favorite slippers
starting of by doing the mold:
As for bad wolfs idea of doing arches:
there are alot of things you can use as starter mold like expanding foam, wood, plaster, putty, sheet metal etc .... i think using expanding foam is the best thing you can go with as its really easy to carve and sand
so time to start, first thing is to get a pice of paper and draw the round part of the arch ( the part between the tyre and body ) then continue to draw how it will look like. copy it on a thich cardboard and spray the expanding foam (the canned one not the one you have to mix thats too messy ) the shape you have on the cardboard ant let it set over night.
Next day you would have like a bubbled up mess but think ahead buy a can of bonda filler and then use a sharp knife to carve out the shape you want it to look like and sand it to make it smoother and rounder. nows its bonda filelr time, follow the instructions on how to mix it and fill in the holes on mold your making try to cover it all in bonda filler and leave it settle over night.
Next day you will have solid form but still needs work sand it in shape starting with p120 till wet grade 1500, make sure there are no deep scratches still visible or touchble and you have your pre-mold ready !!!!
Now the easy part:
Spray it with filler spray to be sure you got rid off minor scratches and then spray it with cheap bottled spray i prefer black as it shows off any imperfections and again let it cure overnight
Now for the proper mold:
you will need:
Gelcoat,release wax,resin,hardner,teaspoon ( not reusable for tea after ) cheap bristle brushes, empty food cans for mixing and fibercloth, try to get 2 types one that is really thin and looks like T.P. and the strand one.
Starting to make a mold:
polish your pre-mold with normal car polish let it dry then remove and 3 times with release wax, removing it everytime, don't worry not all will go off its fine.
when its done fill up a food can ( make sure its clean and dry ) with gel coat and put 1 and 1/2 teaspoons of hardner in and mix well ( if the temp is over 17 deg put in just 1 teaspoon) not with the spoon but any thing you can find like metal/plastic rods that are disposable. Get the brush and start "painting" on your pre-mold and make sure you cover the whole thing. don't worry if itssettling on the cardboard or running down its all gooooood leave it dry overnight ....
Next day: cut out small rectangles of the T.P. cloth ( loll ) about 3 inches wider then the pre-mold and 8 inches thick , remember to touch the pre-mold and make sure its dry if not leave it overnight again ( should have dried up but just incase ) if its dry then mix 1 Food can of resin and put 1 and 1/2 teaspoons of hardner again mix really well and start "painting" it again ( don't worry if you see the gelcoat coming onto your brush its normal )when its done get the T.P. like fibercloth and put at the end ( always start at ends ) and start tapping it in shape with a wet resin coated brush and do as follows:
Do not put the fibercloth like fig 1 it wont be solid when it dries up try to do like fig2 if working on a large surface or in this case fig 3, overlapping the clothes bonds them together and thats the secret behind its strenght
Notes: if there are air bubbles keep tapping them with the brush till is gone and be sure that the whole cloth is covered if it looks dry it needs more resin, aply some more by tapping again with a resin coated brush .. when the whole thing is coated let it cure over night.
Next day again now its time to do all the same as putting t.P. cloth on but instead using the stranded cloth same principle like before but use more resin to make sure its all "wet with resin. let it set overnight and repeat the procces till you have 1 gelcoat layer 1 t.p. layer and 3 strand cloth on it...
then its fully dry and you can pull the-pre mold out !!! and you have a mould you can use till the world ends
theres also a guide on girlsandmotors.co.uk how too do fibre glass job ,just try i nevered worked before this stuff i sad if it goes wrong never mind but i did it and the finalle it looks really well thanks for the input guys
http://www.girlsnmotors.co.uk/car-modifying/fibreglass-sub-box.html
http://www.girlsnmotors.co.uk/car-modifying/fibreglass-sub-box.html
corofin12345
Member +
repped
corofin12345
Member +
like hearing this man.. ah ya its one big family...
") Way better than it was!
Way better than it was!